Battery switch on travel trailer function is crucial for managing your RV’s power. Understanding how to use your battery switch correctly ensures smooth operation and prevents potential electrical issues. This guide breaks down the different types of switches, their wiring, operation, and troubleshooting tips, empowering you to confidently manage your travel trailer’s power system. We’ll cover everything from basic functionality to advanced integration with other RV systems, helping you become a power management pro.
From single-battery setups to complex systems with solar panels and dual batteries, we’ll explore the nuances of each configuration and help you select the right switch for your needs. We’ll also discuss safety precautions and maintenance to keep your system running efficiently and safely for years to come. Get ready to master your travel trailer’s power!
Understanding Battery Switch Functionality in Travel Trailers
Your travel trailer’s battery switch is a crucial component, controlling the flow of power between your trailer’s batteries and the various electrical systems. Understanding its function and operation is essential for safe and efficient RVing. This section will break down the different types, wiring, operation, and troubleshooting of these switches.
Types of Battery Switches
Travel trailers typically utilize one of two main types of battery switches: a simple on/off switch or a more sophisticated multi-position switch. The simple on/off switch provides a straightforward way to disconnect the battery from the trailer’s electrical system. More advanced multi-position switches, often called selector switches, offer more control, allowing you to switch between different battery banks (e.g., house batteries and chassis batteries) or completely isolate the batteries.
Some higher-end switches even include features like a “battery combining” position for charging multiple batteries simultaneously.
So, you’re an audiophile who travels? Awesome! Check out this guide on building the perfect audiophile travel setup for pristine sound on the go. It covers everything from portable DACs to noise-cancelling headphones. But if you’re also into wildlife, consider the tips on minimizing weight and maximizing sound quality found in this other resource about audiophile travel setups , specifically tailored for adventures in the wild.
Remember, great sound doesn’t have to stay at home!
Typical Wiring Diagrams for Battery Switch Setups
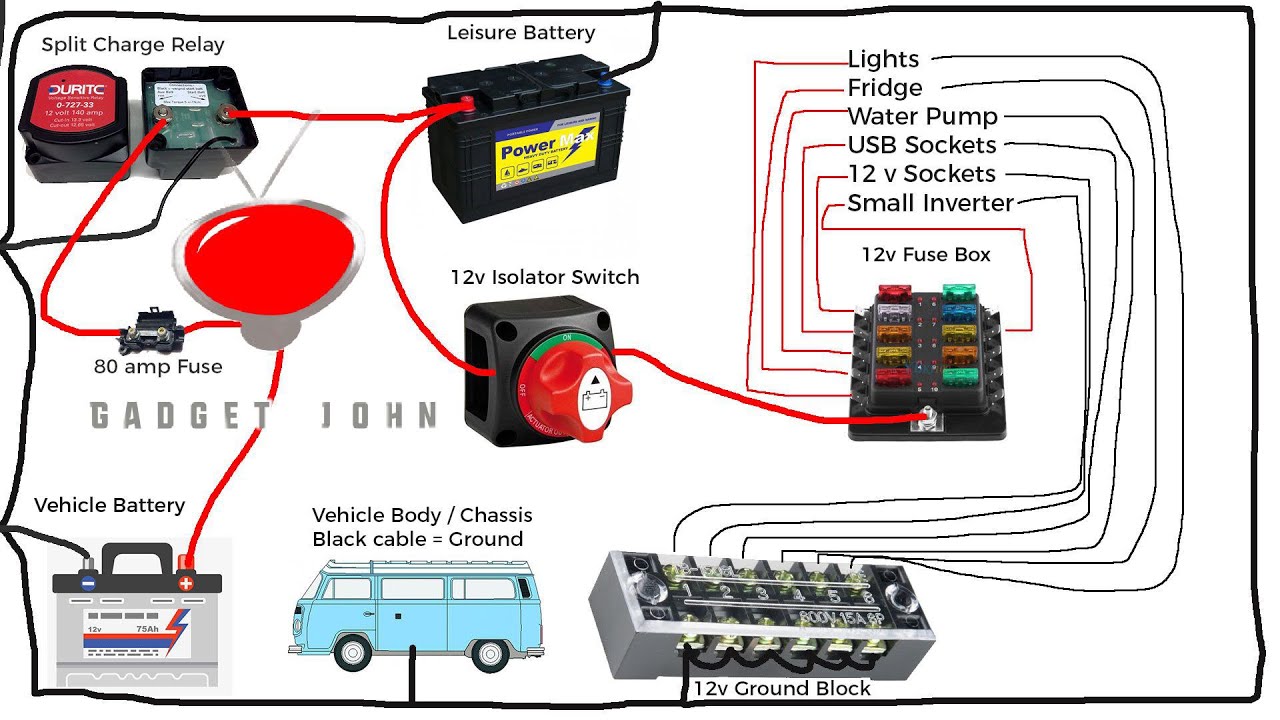
A basic battery switch setup involves connecting the positive (+) cable from the battery to the switch, and then another positive cable running from the switch to the trailer’s electrical panel. The negative (-) cable is usually connected directly to the chassis or a common ground point. More complex setups with multiple batteries and a selector switch will involve additional cables and connections to accommodate each battery bank and the different switching options.
A typical diagram for a two-battery setup with a selector switch might show one positive cable from each battery connecting to the switch, and separate positive cables running from the switch to the house and chassis electrical systems. The negative terminals of both batteries would connect to the trailer’s chassis ground. Always consult your trailer’s wiring diagram for specifics, as configurations can vary.
So, you’re an audiophile who travels? Awesome! Setting up your sound on the go can be tricky, but totally doable. Check out this guide on audiophile travel aetup for tips on packing your gear safely. Then, once you’ve got your essentials sorted, consider exploring different portable audio setups; another great resource for this is audiophile travel aetup , which focuses on lightweight yet high-quality options.
Remember, prioritizing sound quality while traveling doesn’t mean sacrificing convenience!
Operating a Battery Switch, Battery switch on travel trailer function
Operating a simple on/off switch is straightforward: the “on” position connects the battery to the trailer’s system, while “off” completely disconnects it. For multi-position switches, carefully read the switch’s markings to understand each position’s function. Typically, positions might include “Off,” “Battery 1,” “Battery 2,” “Both,” or “Combined.” Always ensure the switch is in the correct position before using any appliances or systems connected to the battery.
Incorrectly setting the switch can lead to malfunctions or damage. For example, attempting to use the house appliances while the switch is set to “chassis” will result in no power.
Troubleshooting a Malfunctioning Battery Switch
If your battery switch isn’t working correctly, several troubleshooting steps can help pinpoint the issue. First, visually inspect the switch for any obvious damage, such as loose wires, corrosion, or broken components. Check the switch’s connections to ensure they are secure and properly tightened. Next, test the battery’s voltage using a multimeter to confirm it has a charge.
If the battery is charged but the switch isn’t working, the switch itself may be faulty and require replacement. If you’re unsure about any of these steps, it’s best to consult a qualified RV technician. Ignoring a faulty switch could lead to electrical issues or damage to your trailer’s electrical system.
Battery Switch Types and Their Applications: Battery Switch On Travel Trailer Function
Choosing the right battery switch for your travel trailer is crucial for managing power effectively and preventing potential problems. Different switches offer varying levels of control and functionality, making the selection process important depending on your specific needs. This section will explore the various types of battery switches and their suitability for different RV setups.
Battery switches act as the central control point for your trailer’s electrical system, allowing you to isolate and manage the flow of power between your house battery (powering interior appliances) and your chassis battery (powering engine starting). Understanding the differences between switch types is key to ensuring safe and reliable power management.
Single-Pole Battery Switches
Single-pole switches offer the simplest form of battery control. They allow you to connect or disconnect a single battery from the system. These are typically suitable for travel trailers with only one house battery and no solar panels. They’re easy to install and inexpensive, making them a popular choice for basic setups.
Double-Pole Battery Switches
Double-pole switches provide more control, allowing you to isolate two batteries independently. This is ideal for setups with both a house battery and a chassis battery. You can use a double-pole switch to switch between batteries, charge one while using the other, or completely disconnect both from the system. This increased control enhances safety and prevents accidental drain on one battery.
Battery Isolator Switches
Battery isolators are automatic switches that prevent the discharge of one battery into another. They’re frequently used with dual battery setups where the chassis battery powers the starting system, and the house battery powers the RV’s appliances. When the engine is running, the alternator charges both batteries. When the engine is off, the batteries remain isolated, preventing a dead starting battery.
Rotary Battery Switches
Rotary switches provide a simple, manual way to select between different battery configurations. They’re often used in combination with multiple batteries and solar panels, allowing you to switch between various power sources and control the flow of electricity to the house and chassis batteries.
Comparison of Battery Switch Types
The following table summarizes the key features, advantages, and disadvantages of different battery switch types. Consider your specific needs and setup when making your selection.
| Switch Type | Features | Pros | Cons |
|---|---|---|---|
| Single-Pole | Connects/disconnects one battery | Simple, inexpensive, easy to install | Limited control, unsuitable for dual battery systems |
| Double-Pole | Connects/disconnects two batteries independently | More control, ideal for dual battery systems | Slightly more complex installation |
| Battery Isolator | Automatically isolates batteries when the engine is off | Prevents battery drain, enhances safety | More expensive than manual switches |
| Rotary | Multiple positions for selecting different battery configurations | Versatile, suitable for complex systems with solar | More expensive and complex installation |
Mastering your travel trailer’s battery switch is key to a smooth and enjoyable RV experience. By understanding the different types of switches, their operation, and common troubleshooting steps, you’ll be equipped to handle any power-related challenges. Remember to prioritize safety, perform regular maintenance, and choose the right switch for your specific needs. With this knowledge, you can confidently manage your RV’s power system and enjoy worry-free adventures on the road!
FAQ Compilation
What happens if I accidentally leave my battery switch in the OFF position?
You’ll lose power to your house batteries and any appliances connected to them. Your chassis battery (for starting your engine) will remain unaffected if it’s on a separate circuit.
How often should I inspect my battery switch?
At least once a year, or more frequently if you notice any unusual behavior like flickering lights or reduced power.
Can I install a battery switch myself?
While possible, it’s recommended to have a qualified electrician or RV technician install a battery switch, especially if you’re not comfortable working with electricity.
My battery switch is making a clicking sound. What’s wrong?
This could indicate a loose connection, a faulty switch, or a problem with your batteries. Check all connections and consider professional assistance.
